
Before You Start
You need:
- HubSpot connected to Petavue. See Connect HubSpot below.
- The data to send: a CSV you attach to the chat, or data from your connected sources. Each row needs a value that identifies the HubSpot record, such as the contact's email.
- Slack connected, only if you want write-back failures sent to Slack. Slack is connected the same way as HubSpot.
Write-back is turned on per account. If you're an admin and don't see the Writeback card in Verify & Publish, contact us at support@petavue.com to turn it on.
Connect HubSpot
A Petavue admin connects HubSpot once for your whole account. Write-back is available only to users with the Admin role. Users with the User or Viewer role can't set up or approve a write-back.
- Select the Settings icon at the bottom of the left sidebar, then open the Integrations tab.
- On the HubSpot card, select Connect and sign in to HubSpot to approve the connection.
- Once it's connected, the card shows a green check and a View Details button.
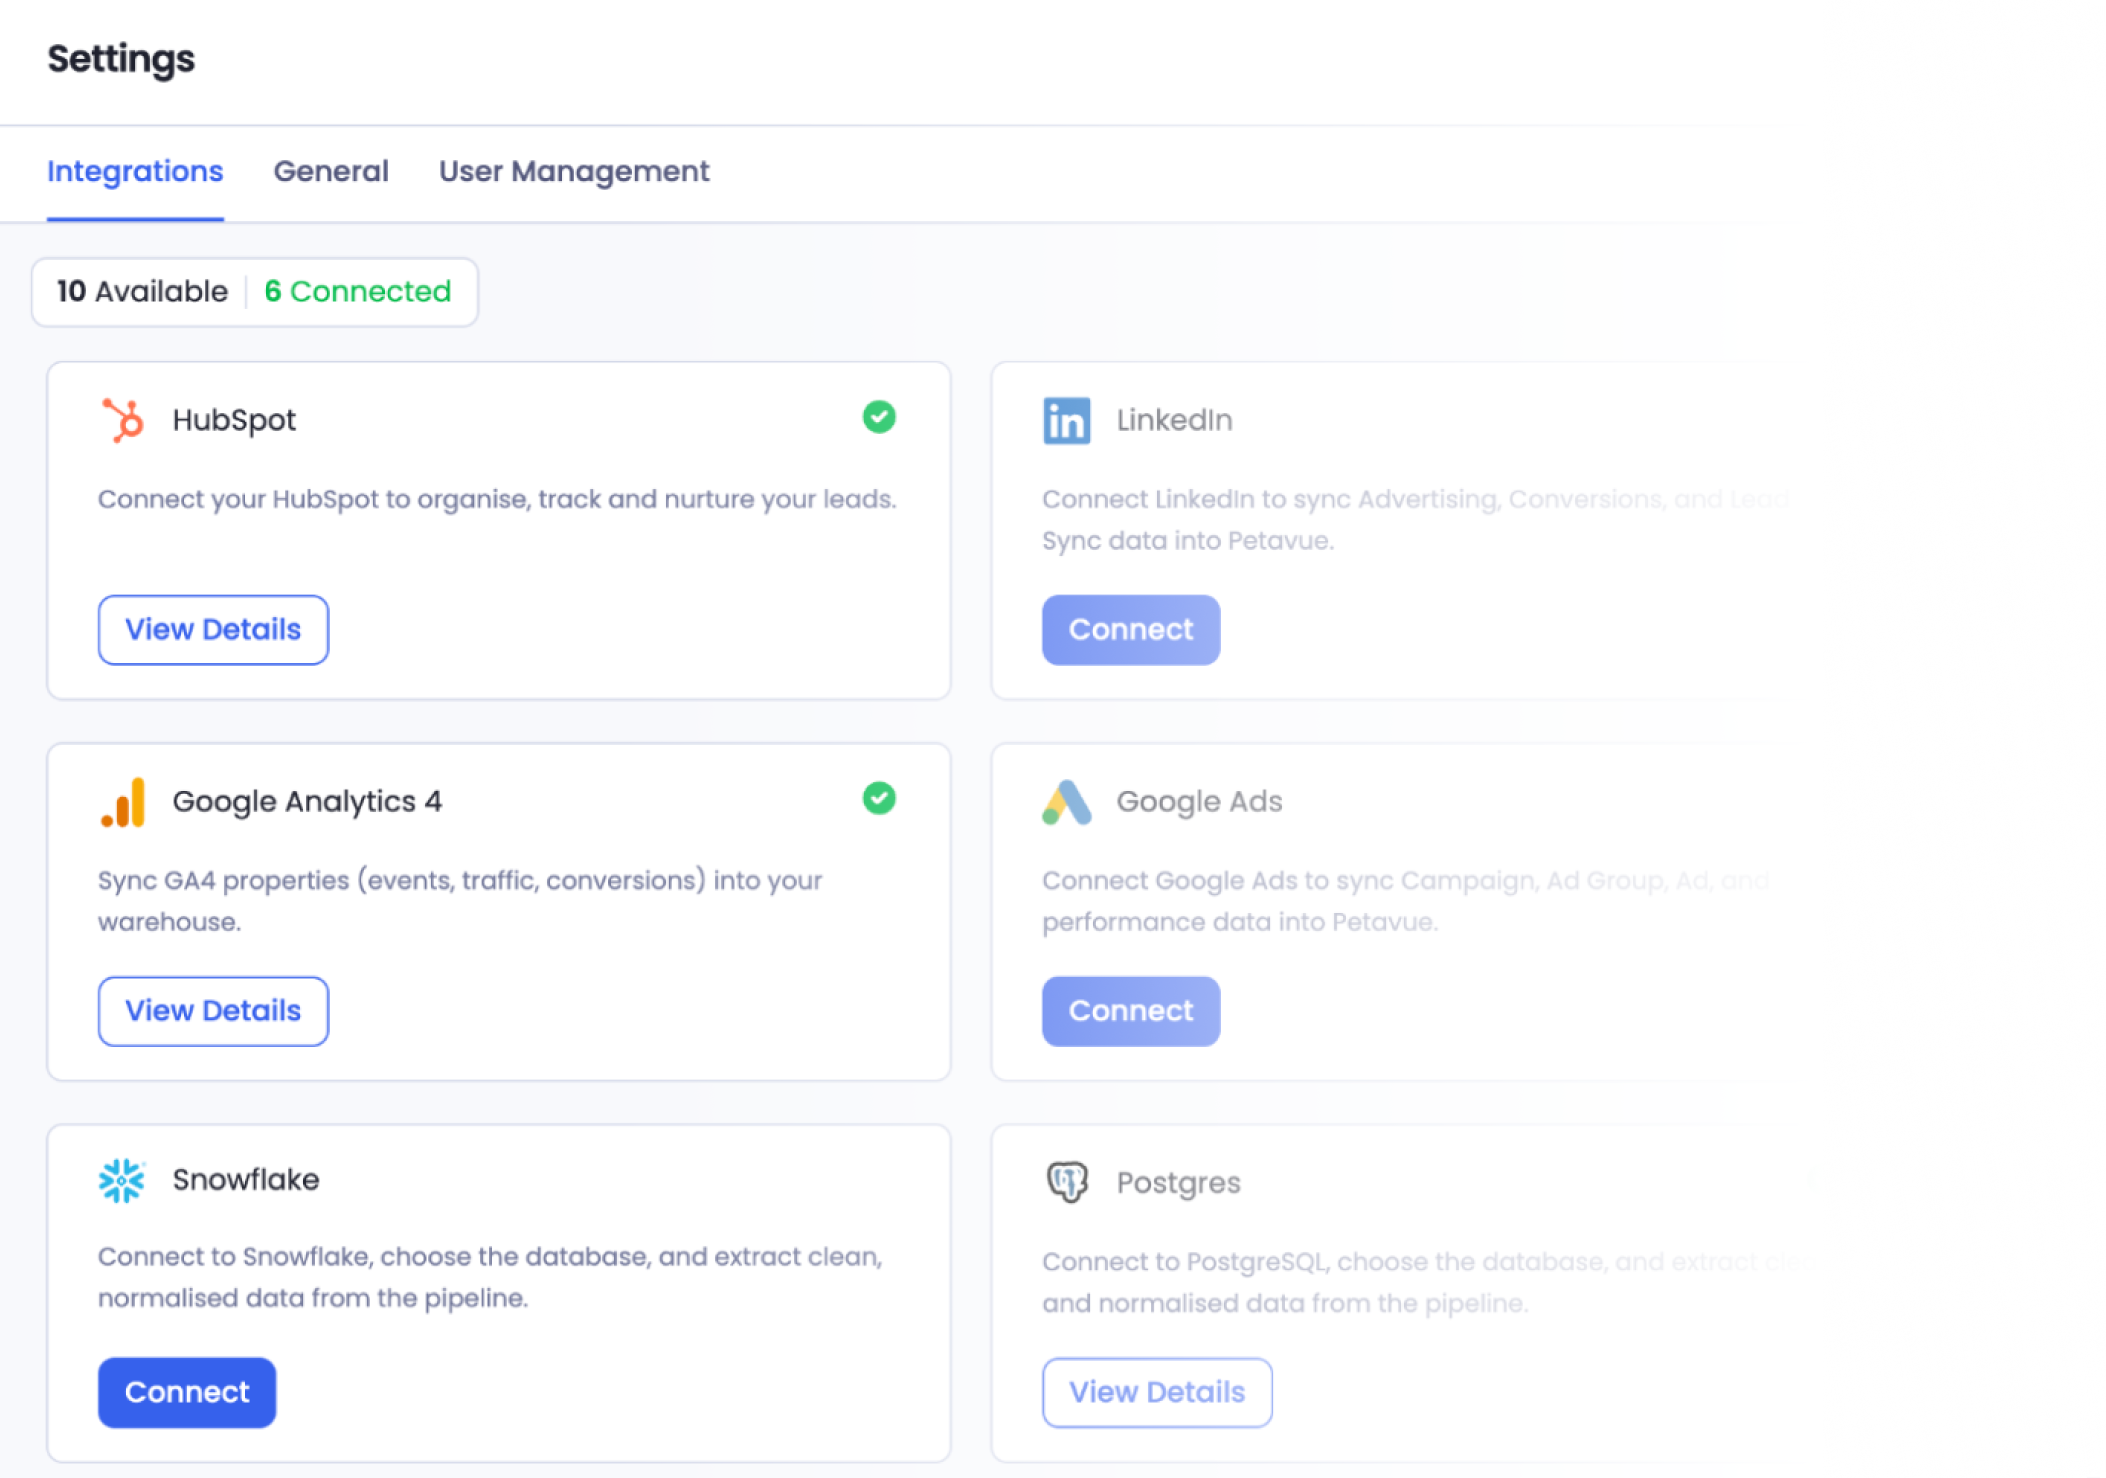
Select View Details to see the connection. The Settings tab there shows the HubSpot account it's linked to and who connected it, with Test connection to check it's working and Disconnect to remove it.
Writing to HubSpot Campaigns needs HubSpot Marketing Hub Professional or higher.
Step 1: Ask Sage for a Write-Back
In a Sage chat, tell Sage you want to write back to HubSpot. Give it the data, either by attaching a CSV or by pointing it at data from your connected sources, and describe what should change in HubSpot: which object, which properties to update, and which value to match records on. For example:
"I want to do a HubSpot write-back. Update the job title on HubSpot Contacts, matching on email, using this data. Show me the mapping preview. Don't write anything yet."
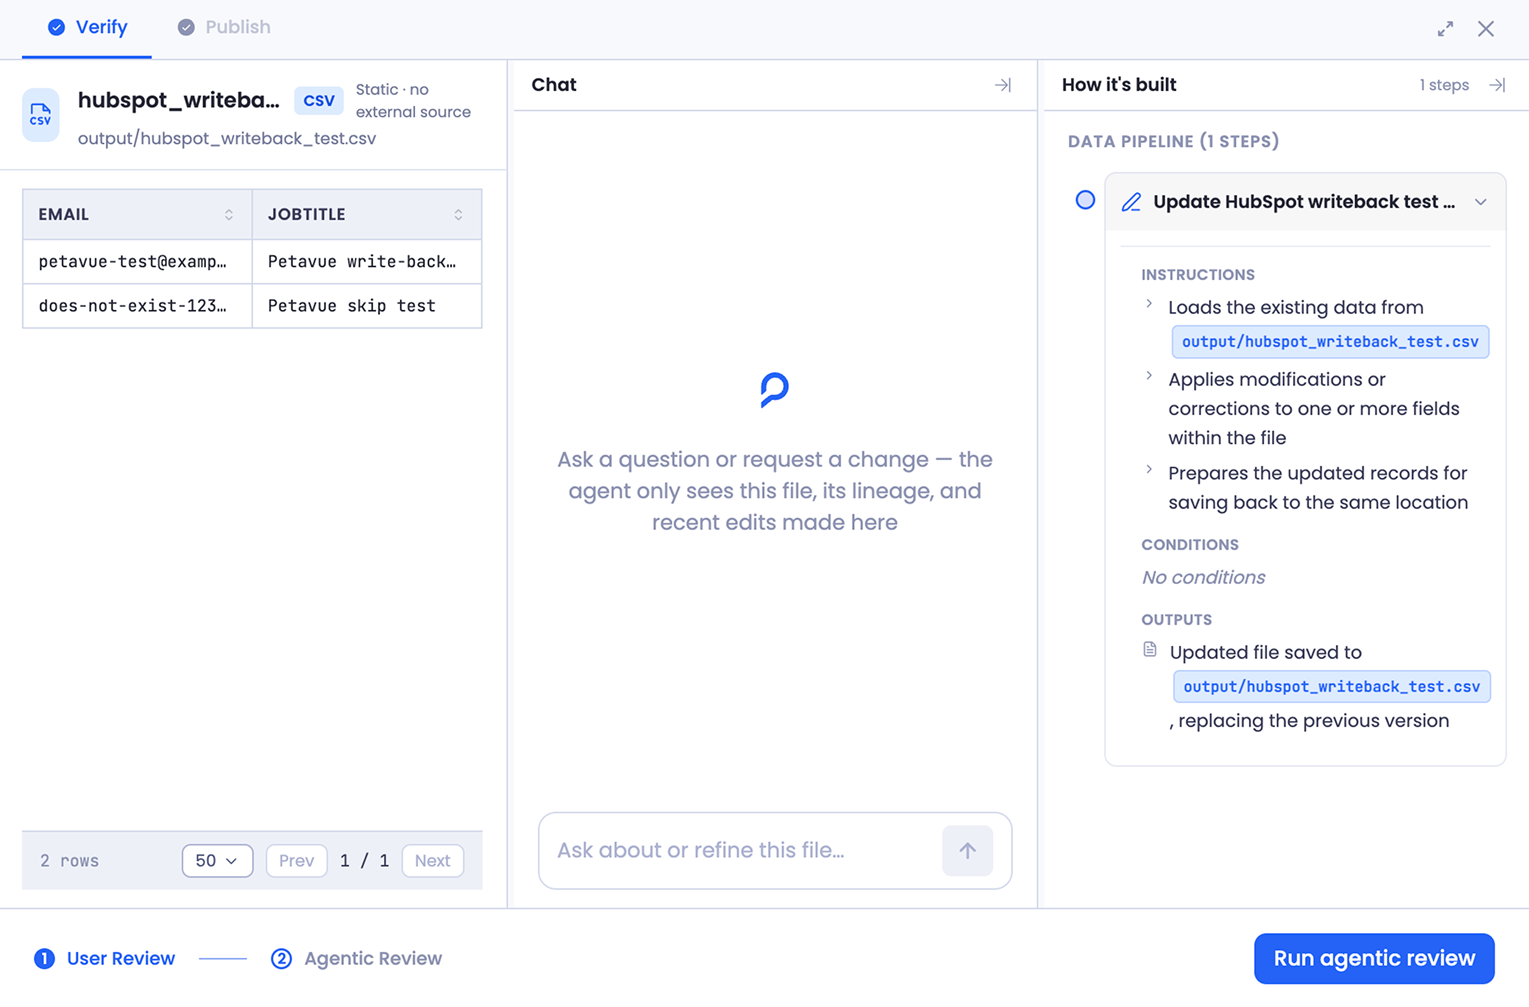
Sage prepares the file to send and saves it in your session's output folder, with one column that identifies each record and one column for each property to update.
Step 2: Check the Write-Back Plan
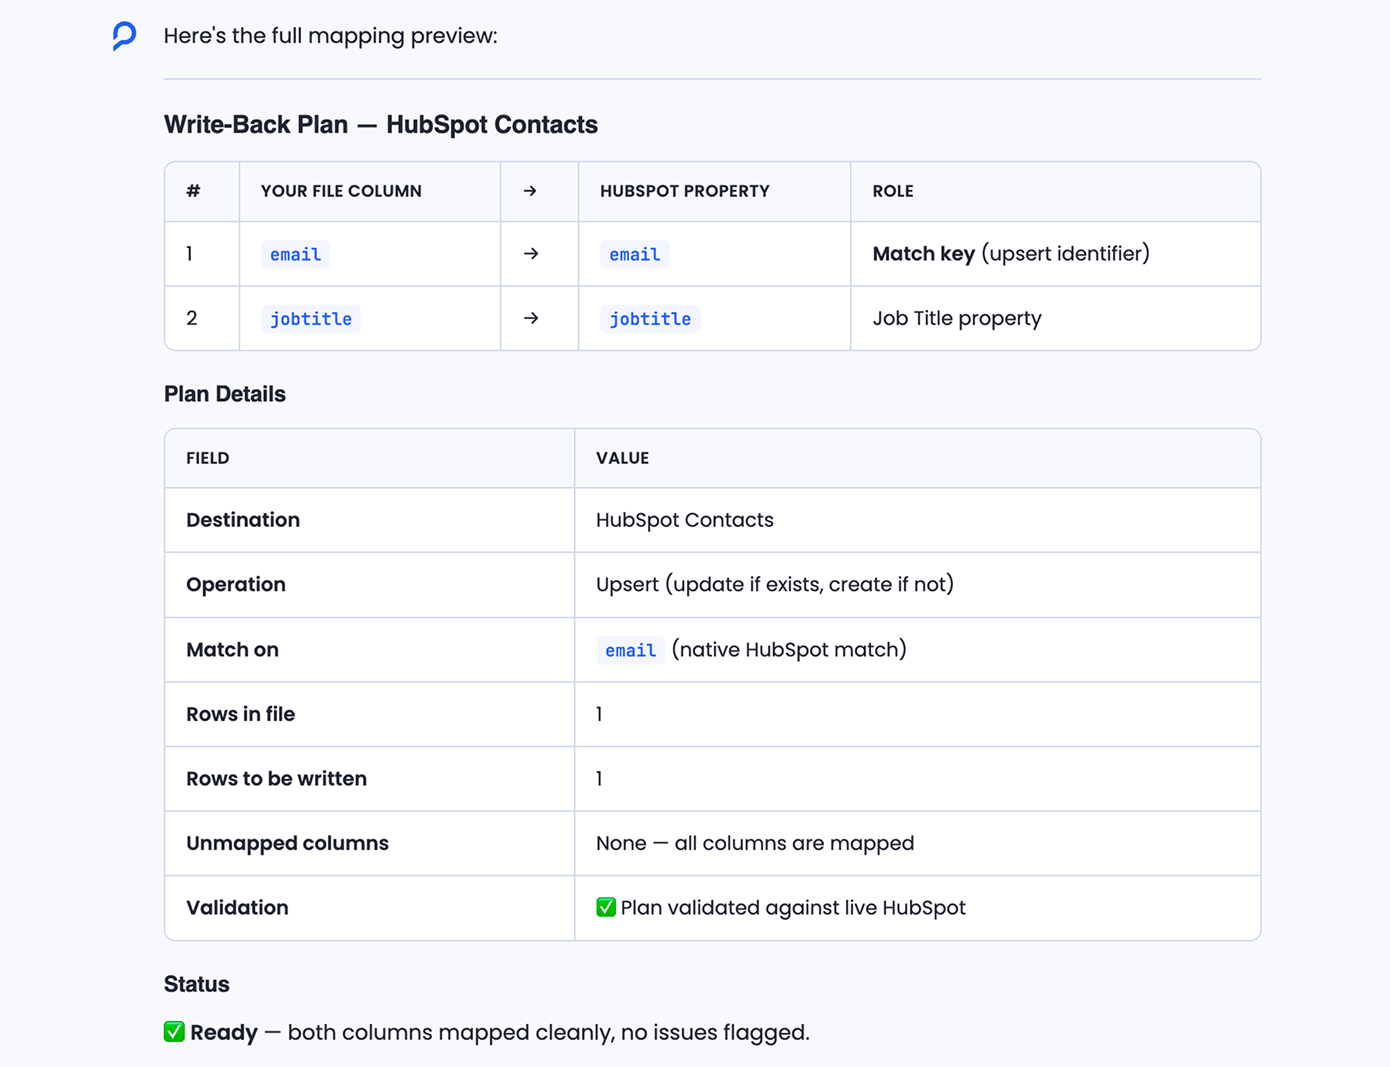
Sage replies with a Write-Back Plan:
- The mapping: each column in your file, the HubSpot property it goes to, and which column is the match key.
- Plan details: the destination, how records are matched, how many rows are in the file and how many will be written, any columns left unmapped, and whether the plan passed a check against your live HubSpot account.
- Status: Ready once every column is mapped and nothing needs your attention.
Nothing is written to HubSpot at this stage. If anything looks off, tell Sage what to change, such as a different property or match column, and it updates the file and the plan.
Step 3: Approve in Verify & Publish
Once the file is ready, select Verify & Publish. Write-back is set up on the Outputs step, in the Publish tab. Under What do you want to publish?, each output has its own card. Turn on Writeback: it sends rows from this file to your connected app on every refresh.
The Writeback card shows two panels:
- Field mapping: each file column and the HubSpot property it goes to, with labels for how records are written and the match key.
- Check: how many rows will be sent, and how many HubSpot checked. HubSpot checks a sample of up to 100 rows, spread across the file.
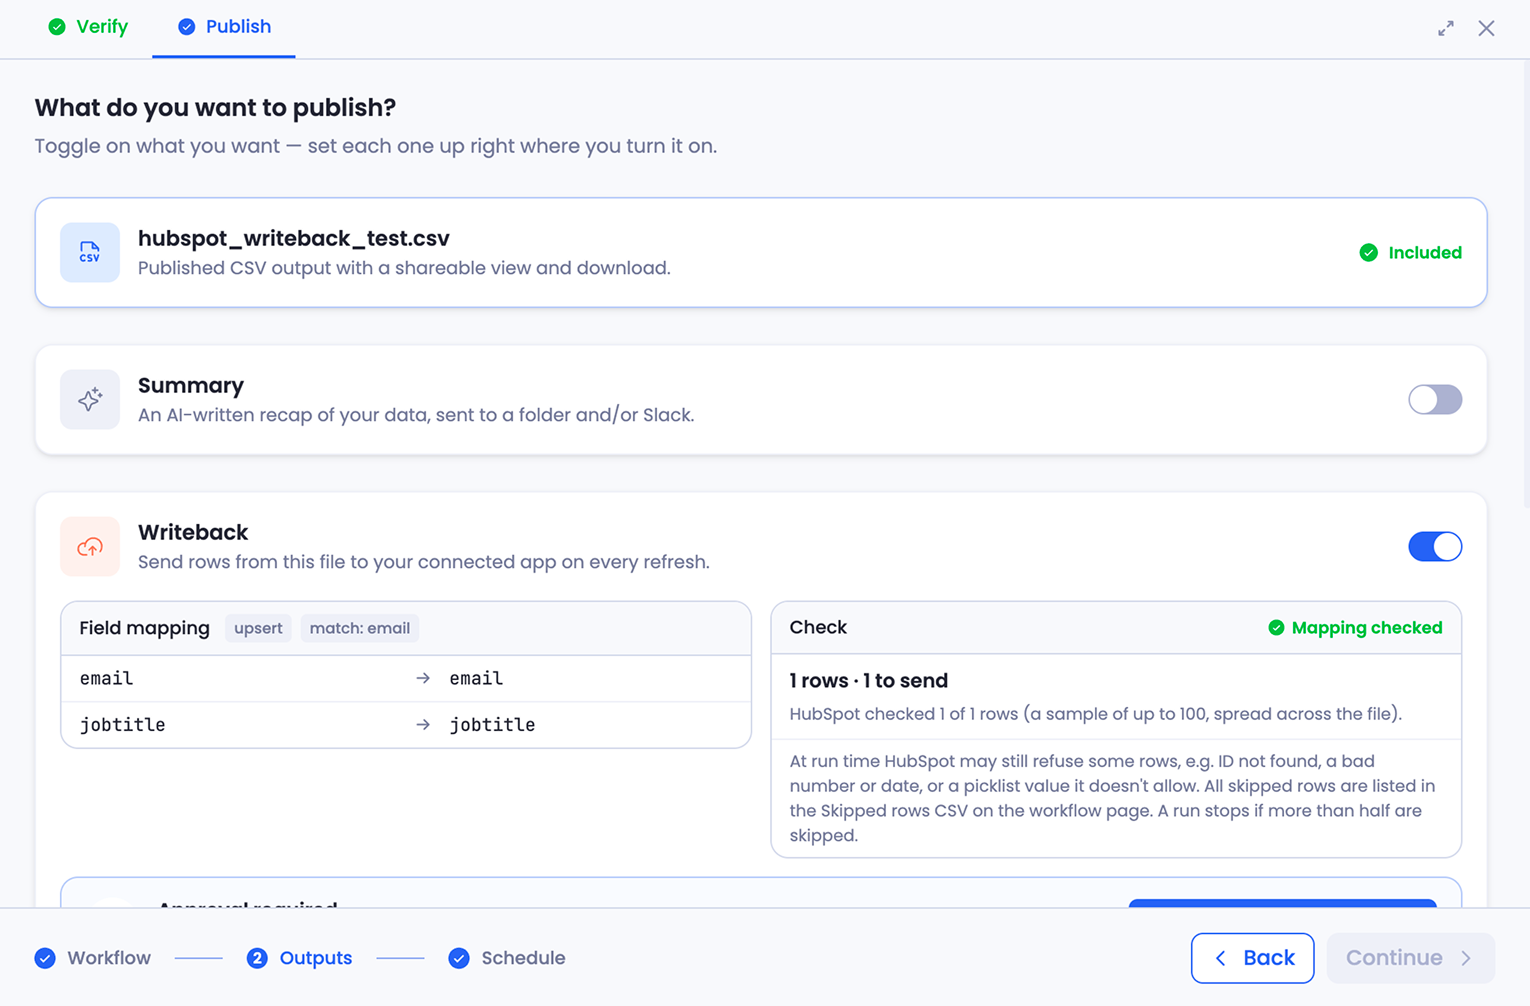
Below the panels, Approval required asks you to review the mapping and the check. Select Approve write-back to approve the rows. You can't continue until you do.
Then select Continue to move through the remaining steps and publish the workflow.
Need a different mapping or filter? Ask Sage in the same chat to update the plan, then come back to Verify & Publish. The newest plan is the one you review there.
Check the Write-Back on the Workflow Page
Once published, the write-back runs each time the workflow refreshes, on the schedule set in the workflow's settings. See Workflow Settings and Failure Alerts.
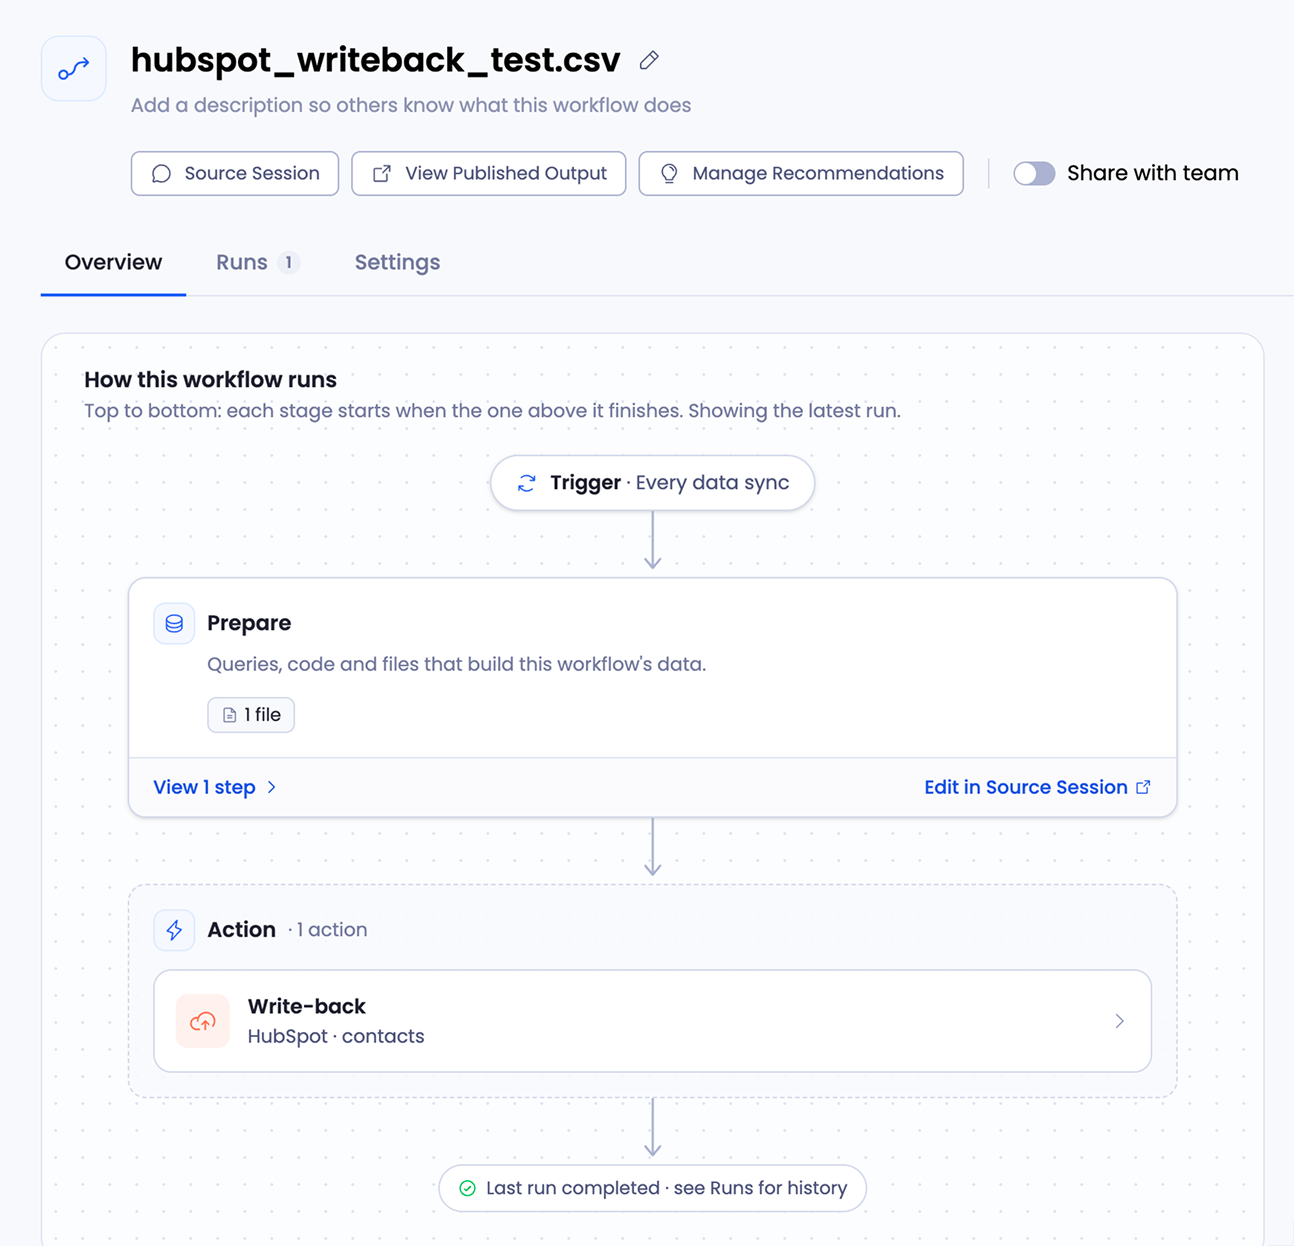
On the workflow's Overview tab, the write-back appears in the Action stage, labeled with its destination, such as HubSpot · contacts. Select it to see its details:
- Destination, Operation, and the column it's Matched on.
- The Source file it sends.
- The Field mapping.
- Who's notified if the write-back fails.
These details are view only. To change the mapping or destination, select Open Source Session, ask Sage to update the plan, and publish again.
Get Told When a Write-Back Fails
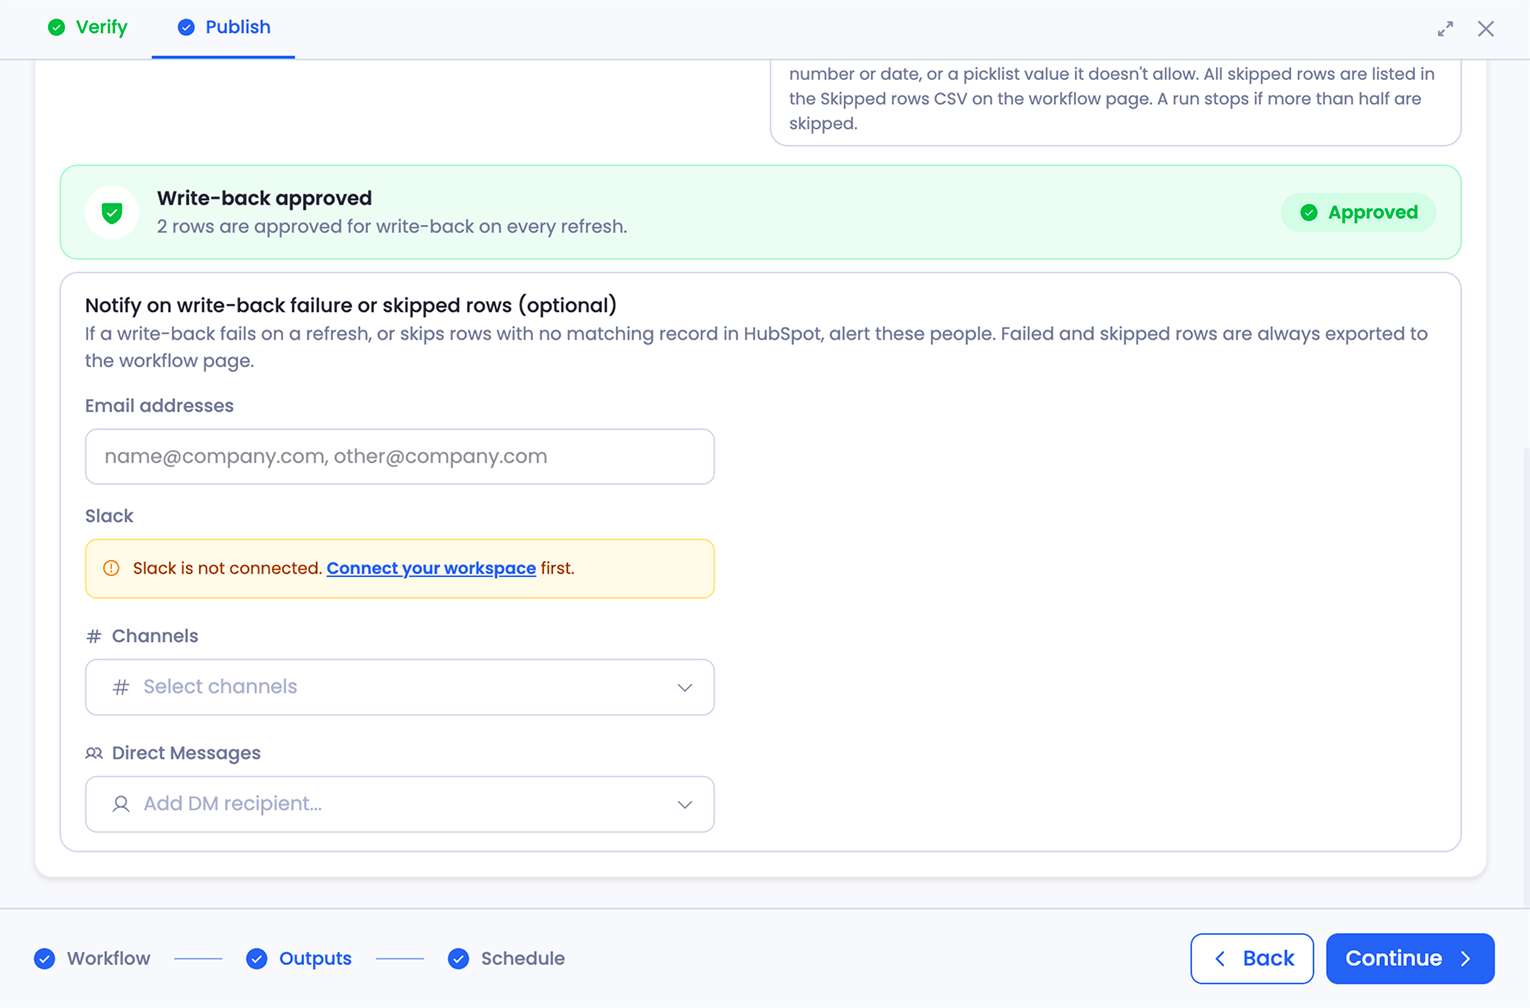
Under the approval, Notify on write-back failure or skipped rows is optional. Add the people who should hear when a write-back fails:
- Email addresses: separate them with commas.
- Slack: pick Channels or Direct Messages. Slack must be connected first.
They're alerted whenever a write-back fails, including when you start the run with Run now. On scheduled runs, the workflow's creator is included automatically.
Rows that are skipped don't send an alert on their own. They're always saved to the Skipped rows CSV, whether or not you add anyone here.
Example: Update a Contact Property
This mapping updates the job title on a HubSpot contact, matched on email:
| Your file column | HubSpot property | Role |
|---|---|---|
| Match key | ||
| jobtitle | jobtitle | Updated value |
The same pattern works for any value you calculate in Petavue, such as a lead score or a last-touch date: one column to match the record, and one column per property to update.
Supported Objects and Fields
Each write-back sends one file to one HubSpot object. Match each row on one of these keys:
| Object | Match on |
|---|---|
| Contacts | |
| Companies | domain or name |
| Deals | dealname |
| Tickets | subject |
| Leads | hs_lead_name |
| Campaigns | hs_name |
You can also match on the HubSpot record ID (hs_object_id) or on any property HubSpot marks as unique.
Properties you can write:
- Standard and custom properties.
- Multi-select properties, with options separated by semicolons.
- Pipeline and stage.
Properties you can't write: read-only, calculated, and lookup properties (a property that holds the ID of another record).
For Campaigns, you can write seven standard properties plus your custom ones.
Value Formats
| Type | Accepted |
|---|---|
| Dates | YYYY-MM-DD, ISO 8601 with a timezone, or epoch seconds or milliseconds. Formats like MM/DD/YYYY are rejected. Date-time properties need a timezone. |
| Numbers | Commas, currency symbols, a trailing %, and negatives in parentheses are all fine. |
| True or false | true/false, yes/no, y/n, t/f, or 1/0. |
| Picklists | The option's internal value in HubSpot, not its label. |
What Happens on Each Run
Updating and creating records. The plan's Operation decides what happens to a row that doesn't match a HubSpot record:
- Upsert updates matching records and creates a new record for any row that doesn't match, as long as the fields HubSpot needs to create one are mapped.
- Update only changes records that already exist. Rows with no match are skipped.
Matching on the record ID never creates records, and a row whose value matches more than one record is skipped.
Retries. If HubSpot is briefly unavailable or busy, Petavue retries the call automatically. Calls that create records aren't retried, so you never get duplicates. If a scheduled run fails, Petavue tries it up to three more times, two minutes apart, then waits for the next scheduled run. A run started with Run now isn't retried.
Limits. Each run sends up to 2,500 rows, from a CSV or JSON file of up to 10 MB.
Safeguards
- Nothing is sent until you approve it. Sage's plan doesn't write to HubSpot, and the workflow can't be published until you approve the write-back in Verify & Publish.
- HubSpot checks the mapping first. Before you approve, HubSpot checks a sample of up to 100 rows against your mapping.
- Problem rows are skipped and listed. At run time, HubSpot may still refuse some rows, for example when a record isn't found, a number or date is in the wrong format, or a picklist value isn't allowed. The rest of the rows still go through.
- A run stops if more than half the rows are skipped. Rows already written stay in HubSpot, and the rest aren't sent.
Find Skipped Rows
Skipped rows are saved as a Skipped rows CSV in two places:
- On the workflow page, in the write-back's details panel.
- On the Runs tab, for each run.
The file holds the original rows plus a skip_reason column with a code for why each row was skipped, such as NOT_FOUND or DUPLICATE_MATCH_KEY.
Troubleshooting
Some rows didn't update. Download the Skipped rows CSV and check the skip_reason column. Common causes are a record that wasn't found, a match value shared by more than one record, a date in an unsupported format, or a picklist label used in place of its internal value. Ask Sage to fix the values, then let the workflow refresh.
New records appeared in HubSpot. The plan's operation is Upsert, which creates a record for any row with no match. If you only want to change existing records, ask Sage to switch the plan to Update and publish again.
The run stopped. More than half the rows were skipped. Check the Skipped rows CSV for a pattern, such as the wrong match column, and ask Sage to fix the file or the plan.
Nobody was alerted about skipped rows. Alerts go out only when a write-back fails. Skipped rows are listed in the Skipped rows CSV.
You can't add Slack to the alerts. Connect Slack first, from Settings > Integrations, then return to Verify & Publish.
You need to change the mapping. The write-back's details on the workflow page are view only. Select Open Source Session, ask Sage to update the plan, then review the newest plan in Verify & Publish and publish again.
Getting Help
If you have questions, run into issues, or want to share feedback on the experience, reach out to us directly at support@petavue.com. We're available and responsive, and your input matters.